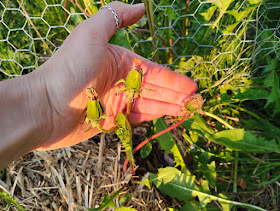
Of the four left, three are probably duds judging by how clear they look when we use our phone flashlights to see inside the incubator. Not candling by any means, but they are not as dark as they should be and also not as heavy (I picked them up when I took the baby ducks/empty eggs out).
Or... my trek in the world of education (mine and others) & all the joys & trials that come with it.
Friday, May 30, 2025
13/16
☝️is my prediction of our hatch rate for this round of duck egg incubation. At this moment, we have 12 babies hatched and four eggs to go.
Thursday, May 29, 2025
Baby Ducks
It's hatch day for the ducks!
Yesterday I was in the laundry room throwing a load in the washer when I heard a little crack. One of the eggs had pipped! Shortly after that I heard another pip. It's hard to see the eggs in the back, but by the end of the day, at least five eggs had pipped. They didn't do much overnight/into the morning, but by early afternoon, the first had broken out...
I went downstairs to check on them at lunchtime, saw a couple eggs had made progress, went back upstairs, and when I came back down a couple minutes later there was a baby duck.
Note the penciled X on the shell. Our first duckling was one of the eggs that had been refrigerated prior to hatching.
Next to it is an egg with a green line. That indicates that it was put into the incubator cold straight from the fridge instead of allowed to get to room temperature like the others.
Wednesday, May 28, 2025
Rhubarb
My rhubarb patch is still small, but it's getting fuller!
I noticed that one of them has a seed head. This will help the plant strengthen and grow.
Maybe next year it will be ready to harvest!
Tuesday, May 27, 2025
Battle of the Dandelions
The garden center is slowing down which means G is home a little more. We took the opportunity to start one of the many projects in the queue.
Neither of us have had time to mow and the lawn has gotten away from us. Our lawn is an absolute mess of dandelions.
But as I pulled more dandelions, I noticed that some of the ones I had left before turned to fluff anyway.
Probably some like this that looked like they were still yellow. Those sneaky plants...
So, a lot more dandelions this time around got chucked outside. There are still a lot of weeds growing in the garden and no new vegetables, but at least all the things that would spread seeds are gone.
To end on a positive note...
Monday, May 26, 2025
Tortillas
I tried my hand at making homemade tortillas, and holy cow! I don't think I'll ever go back to store bought tortillas again haha.
In true Emily fashion, I had two recipes I tried at the same time.
Recipe number two was my second favorite. However, I read the instructions wrong and used baking soda instead of baking powder, so I will need to give this recipe a try again. I found that this recipe rolled out very thinly, but in cooking them, they ended up flatter and more like a pita.
Friday, May 23, 2025
Wipe Spray Take Two!
We're nearing the end of our first spray bottle of wipe spray that I made down in New Orleans. If you remember back that far, I made some liquid Castile soap out of a bar of soap, but I didn't have an immersion blender to blend it up. That was step one of making these wipes. Before, it had small solid beads suspended in thick olive green gel. Look how nice it blended together:
There was a learning curve.
The first leaf accidentally had some dirt on the end, which ended up going into the measuring spoon. The second leaf I tried ended up with some of the green part in the measuring spoon along with the gel because I scraped it too close. Eventually, I found a method that worked.
I cut a leaf off the plant, sliced it open, and used the knife to scrape the gel into a measuring spoon.
All the good stuff went into a glass jar for mixing. Doesn't look too appetizing does it?
I did a quick couple pulses with the immersion blender when all the ingredients were added, and my wipe spray was made!
I did a quick couple pulses with the immersion blender when all the ingredients were added, and my wipe spray was made!
Thursday, May 22, 2025
Sprouts
A couple of weeks ago I started seeds in old plastic seed starting containers from last year's purchased plants. I put them in this plastic organizing drawer to help them stay moist while waiting for them to germinate. It works surprisingly well!
I'm trying an experiment with my green onion plants. They had been just in water on the windowsill in the kitchen, but after harvesting them once, they're at a point where they probably won't grow very much more. In my experience, you can get one or two more cuttings off the tops before their growth slows.
Wednesday, May 21, 2025
Pool Ladder and Plant Exchange
G had the great idea to use an above ground pool ladder to get from one side of our fence to the other where we don't have a gate. He found two on Facebook marketplace for a reasonable price. One is here, on the west side of the fence so we can get to the windbreak and water it easier. The other is on the north side of the north pasture. You'd be surprised how often we need to access those areas, but it's not quite often enough to put a gate in.
Tuesday, May 20, 2025
Cutting Board "Remodel"
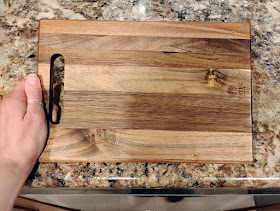
We upgraded from flimsy plastic cutting boards to a trio of nice acacia wood boards we found on Amazon. Unfortunately, they came with some kind of waxy coating that easily comes off, resulting in a washed out mottled look that does not show off the acacia wood to its advantage.
This is the largest (and least used board). The other two look super worn and old even though we've only used them for about a week.
However, I have a grand plan.
I used some heavy duty scrubbing brushes to rub off as much of the wax coating as I could.
Voila!
Monday, May 19, 2025
Potatoes
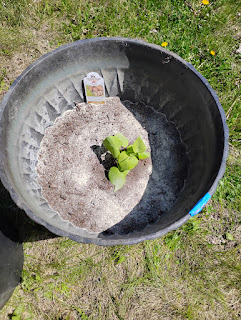
I'm doing an experiment this year by planting my potatoes in containers. I've heard that the yield is a lot higher in containers, not to mention easier to harvest. I picked up three seed potatoes from the garden center and cut them up before planting. It's good to let them sit for a day or two to let the cut harden off, and I separated the three varieties with onions so I could keep them separate.
When I was time to plant, I got all of my bins out and made sure there were enough drainage holes. I also plotted out how many potato plants would realistically fit in each bin.
This is one of my sweet potato plants with the bone meal before I watered it.
I ended up with three sweet potato varieties and three regular potato varieties ( kennebec, and two red potatoes that I don't know the names of). I still had some potatoes left from last fall's harvest and I thought, " why not give it a try? " So I cut up and planted one of those. Each bin is labeled so I can keep track of how they're growing! As the plants get bigger, I will add more soil to the bins to make bigger hills. As long as I can keep up on watering them and pests aren't too bad, I should have a pretty decent harvest.
I ended up with three sweet potato varieties and three regular potato varieties ( kennebec, and two red potatoes that I don't know the names of). I still had some potatoes left from last fall's harvest and I thought, " why not give it a try? " So I cut up and planted one of those. Each bin is labeled so I can keep track of how they're growing! As the plants get bigger, I will add more soil to the bins to make bigger hills. As long as I can keep up on watering them and pests aren't too bad, I should have a pretty decent harvest.
Friday, May 16, 2025
Duck Egg Update
The incubator has been running smoothly so far. We've been able to keep the laundry room around 72° and the only maintenance I need to do on the incubator is check the water level daily to keep the humidity up.
This incubator does a pretty good job keeping the humidity a steady 55% as long as there is water in the tiny well. You can see where water is added at the bottom right of the incubator. Right now I only add water to the left side. The red tab will be pulled out three days before hatching so that we can add more water and spike the humidity.
Thursday, May 15, 2025
Chicks' New Digs
All the chicks have been relocated from the garage out to the goat shed.
The two batches of kittens on the chicken side of the shed made the relocation more complicated than it should have been, but I think we have everything in place now.
Dixie isn't a huge fan of the babies and tolerates them for the most part. I have seen her peck their heads if they get too close to her.
G hung the waterer and the feeder so that they are not resting on the ground. That has helped with food waste and water spillage. I have a long-term plan to make a new bulk feeder and waterer that don't need to be hung to prevent waste, but that has been low on the to-do list.
We started out with both the bigger chicks and little chicks all in the same area with the cats. But the next day when I came out to check on them, we were missing one of the little chicks. We searched everywhere and never found it. I suspect one of the mama cats enjoyed a meal brought right to her doorstep. The interesting thing is we never saw any feathers indicating it was a meal.
As a precaution, we moved the remaining four little chicks into a separate area that would be harder for the cats to get into (the cats leave the bigger chicks alone).
Unfortunately this blocks the mama cats from getting in and out of where their kittens are. We had to set up boards so the cats could climb out. So far everyone has been able to get where they need to be.
Wednesday, May 14, 2025
Blooms
We thought the lingenberries were dead...
But I spotted some new leaves poking up from the soil!
The raspberries have spread... See those tiny green leaves to the left of the main plant?
One thing that is not blooming/growing is my orchid. Both the stem cutting that I thought might grow a leaf and the bloom cutting got squishy and gross, so I finally threw them away. Guess I'll have to get a new orchid another time.
Tuesday, May 13, 2025
Sourdough Discard Pizza
You'd think I would be taking better care of my sourdough starter now that I'm home... 😬
It was well past time to refresh my sourdough starter, but I didn't want to take a long time dealing with the discard. It didn't occur to me that I could just leave it in a container in the fridge to deal with later. 🤦♀️ Instead, I used the discard to make a super quick pizza base in our cast iron.
Step one, let the cast iron heat up so that the dough will be easy to scrape off later.
Step two, spread the sourdough discard all over the base and sides of the pan. I forgot that I did a smaller refresh of the sourdough last time so that all I'd need to do to refresh would be to add more flour and water to the whole mix. Sorry past Emily; your time saving trick was for naught.
When I spread the discard around the pan, it didn't even make it to the edges. Guess the pizza will be small.
Step three, let the dough cook for a little bit, then add toppings. I cracked some duck eggs over spinach, mushrooms, and onions. Cheese and avocado were added later.


